
Since everything in bread baking is interconnected, even a small deviation from the regular can throw the entire process off. The result might not be a complete disaster, but the bread might not look exactly what you had in mind when you started to bake it!
For bread makers like me, dense bread loaves are the worst nightmare because they are extremely difficult to bite into and are as hard as bricks!
While most people would discard their dense bread and turn it into something else entirely, I have found some incredible ways to keep my bread fresh and improve its texture, fluff, and airiness.
Learn why your bread will be dense and heavy in this post, as well as some tips for making it lighter and more airy.
To find out how I did it, keep scrolling!
Why Is My Homemade & Sourdough Bread So Dense?
Don’t discard your bread if it’s overly dense. Understanding the cause of the problem is essential to preventing it in the future. Finding the cause of the bread’s dense texture isn’t always easy, though. Numerous factors might impact the texture of the bread.
Incorrect Flour Type
Since flour has always been the most crucial ingredient when baking, I don’t find it surprising that using the incorrect amount of flour can make the bread heavier and denser.
High-protein flour is essential to creating light and fluffy bread. On the other hand, its low-protein counterpart degrades the texture of the dough since it is unable to consistently construct gluten networks.
I constantly have to remember myself to look up the protein value of flour before purchasing it from a grocery store or supermarket. To each their own, but a flour packet containing around 12% protein seems to be a decent place to start.
I never imagined that, given my mediocre baking abilities, my bread batches would feel so soft that they practically melted against my tongue!
Too Much Flour
If you overdo it, your bread will turn up dense and heavy even with the right flour selection. A common mistake is adding too much flour to the dough, especially by individuals who are inexperienced and don’t know how bread dough should look.
When you are done mixing the dry ingredients with your liquid ingredients to make the dough, it should be soft and slightly sticky.
Do not add more flour right away if the mixture seems too sticky after the ingredients have been combined. Start the kneading process by placing the dough on the kneading surface.
Too Much Salt
Salt regulates the rate of yeast activity, causing a slow and consistent growth. This makes it possible for the yeast to develop its unique bread flavor. Salt also helps to reinforce the gluten structure of the dough, which slows the expansion of trapped carbon dioxide bubbles.
Your bread will be dense because too much salt inhibits the yeast from rising and gas from being retained. When you taste your bread, you’ll realize it has too much salt in it.
Lack of Kneading Yeast Dough Time
As the yeast breaks down the carbohydrates in the flour, gasses are released. The net that the gluten creates traps these gasses inside the dough. This is the reason for the fluffy, airy texture of your bread.
The dough is kneaded into this web. You don’t give your bread a chance if you don’t knead the dough sufficiently because the gluten didn’t have enough time to form that mesh.
I must also remember that over kneading a bread can also have unfavorable effects. It can make your dough old or overworked, which will reduce the effectiveness of the yeast as it loses some of its vitality. There’s a fine balance of time here.
Make sure you knead the yeast dough for a minimum of ten minutes using a mixer fitted with a kneading hook, or for twenty minutes by hand. Until it becomes pliable and springy to the touch.
Insufficient Moisture
Your dense bread may occasionally be caused by a lack of moisture in the bread. More specifically, when you add too little water to your flour, it feels dry and gritty, which prevents the yeast from growing and doing its magic.
Be patient if this is your first time! I’ve been there before, and it took me a long time to figure out the precise amount of water needed for each of my recipes. Practice consistently, and you’ll see growth in no time.
False Measurements
Another common reason for dense bread is inaccurate measurements of ingredients. Using a kitchen scale can help ensure accuracy in your recipe. Remember, precise measurements are key to achieving the perfect texture and consistency in your bread.
You should measure using a kitchen cup, in my opinion. With scales, you can measure each ingredient precisely.
You are unaware of how many of the necessary ingredients are in a measuring cup when you use one. For example, you never know if the flour in a cup you are using to measure it is packed tightly or not.
Your Kitchen was Excessively Cold or Warm
It could be affecting your bread’s proofing phase if the temperature in your cooking area or anywhere you are making bread is too warm (above 70–80F) or a little cool (below 60F).
It’s probably overproofed if it’s warm and you ended up with a thick loaf. Excessive activity from the yeast caused a lot of gas to be produced, which the dough managed to burst like a balloon.
Too cold, in which case the opposite might have happened. The yeast was not given the chance to become active enough and produce enough gas to rise the dough. It needs to rise for a little while longer.
Under Proofing
The final resting period a loaf of bread dough has before going into the oven is called proofing. It’s the most delicate stage of bread preparation. But you have to stay nearby and let it fully rise. This will enable the dough to expand gas-wise, which is crucial to resolving problems with dense bread.
You may check for preparation with the finger poke test for various loaves. Make small indentations in the dough with your fingertip as you gently poke it. Should the imprint progressively reappear, you are ready to proceed.
It is over proofed since when you poke it, there is no resistance. However, the dough is under-proofed and needs extra time if you poke it and it just bounces back up without leaving much of an impression.
Relevant Post: Does Bread Have Eggs?
How to Make Bread Less Dense?
Now it’s time for a topic specifically about how to make bread less dense! So if you are frustrated with bread turning out dense, dull, or quickly becoming stale, this section will help you.
Use Right Yeast
Yeast must be used when shaping the dough if you want your bread to rise correctly. Make sure you have fresh yeast if you are using active dry yeast. Furthermore, they won’t function properly if they are too old or moist.
It needs to be activated with sugar and water, thoroughly mixed, and then let rest for ten minutes. Following the waiting period, a layer of bubbles ought to be visible at the water’s surface. This combination can now be used with flour. You can be certain that your yeast has gone bad if there isn’t any bubble.
One thing to remember is that you should avoid putting yeast in close touch with salt while utilizing it. Before adding the yeast, combine the dough with the salt.
Shape your Dough Gently
Bread dough shaping is a skill. Knowing how much gas to force out of the dough during shaping presents the biggest obstacle after you have mastered some shaping techniques.
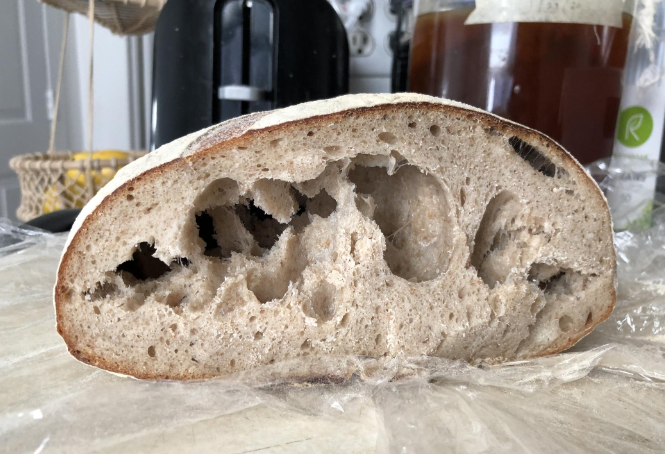
The yeast will run out of carbohydrates if too much is removed, which will prevent it from producing enough gas during the second rise to adequately raise it. You will have big, uneven holes in your bread if you remove too little gas.
For the initial rise, give your dough a 40–50% rise. The amount you degas isn’t as important at this point. Whether you use a lot or little, you’ll still get a good loaf. Your bread can be improved by adjusting the amount of gas eliminated.
If you observe that the rise weakens toward the end of the oven spring during the final rise, you have two options: either reduce the height at which the spring rises during the first rise by 20–30%, or shape the spring more gently to retain more of the gas that is present.
Use Bread Flour
It is crucial to use bread flour rather than all-purpose flour while preparing bread. Because bread flour has more gluten or more protein, the dough is lighter and fluffier, resulting in a less dense final product. More stability, shape, and ultimately an increase in the amount of rise are produced by this high protein content.
Bread made using all-purpose flour is shorter and rises less. To go a bit further, bread flour has more gluten because it has a higher protein level. The dough is made soft and stretchy by gluten.
To put it simply, bread flour was created especially to be combined with yeast for baking bread. All-purpose flour works well most of the time, but when it comes to baking, pastry, and bread flour, specialist flours like cake and pastry flour can produce better results.
Use bread flour while baking homemade bread if you want it to be light and fluffy. I promise you won’t be disappointed.
Use Folds and Stretch For Bulk Fermentation
Use of folds and stretch will be highly recommended for bulk fermentation enthusiasts.
Occasionally, I use them for my baking fermentation to fix my dense bread as well, and the results are immediate.
These tools stretch and realign the gluten matrices, which in turn redistributes the ingredients and dough’s gluten to speed up the fermentation and development of gluten. That’s why my entire batch comes out really fluffy and soft.
Adjust The Water Level
If you use too much water, the gluten strands may become flooded and unable to support the aerated structure of your bread, while too little water will harm the gluten during kneading.
You should stop adding water to the dough in the subsequent steps if it has already been overfilled. Keep an eye on the water amount and make adjustments as needed.
Conclusion
It’s evident that creating something for the first time is difficult. To truly understand how everything works, a few tries are required. I have included a few typical causes of a dense loaf. Hopefully, this guide will help you achieve lighter, fluffier bread. When you get experience, then it is just as simple as it looks.