

Key Lime Pie is likely to be among the most celebrated of all desserts, with its tart-but-sweet flavor, decadence, and crunch. From the Florida Keys, this dessert will marry up refreshment from the lime zest and decadence from condensed milk into a flavor that nothing else can match.
This easy-to-follow recipe is perfect for any baking level and results in a dessert great for family gatherings, holidays, or a personal treat, using just a few simple ingredients.
Contents
Glocery List for Key Lime Pie
Ingredients for the Filling:
- 1 can (14 ounces) sweetened condensed milk
- Fresh limes (to get 1/2 cup juice and 4 teaspoons zest)
- 4 large eggs (to separate yolks)
- Salt
- Kitchen staples: salt
Ingredients for the Crust:
- Graham crackers (1 box should be plenty)
- Granulated sugar
- Unsalted butter
- Salt
Serving Topping:
- Heavy cream (1 small carton)
How to Prepare Key Lime Pie
What You Need
Prepare all the ingredients before take a start. This work gets done quickly, and the chances of things going wrong are very low.
Preparing the Filling: Your First Task
Take a large mixing bowl and a whisk. Before using all the ingredients, measure them once and set them aside.
- Add the sweet, creamy condensed milk.
- Use fresh lime juice (beware of the seeds).
- Add the bright, zesty lime zest.
- Separate those egg yolks (but carefully).
- Put a tiny pinch of salt on top
Whisk these ingredients together until they combine and form a smooth mixture. After this step, I don’t use the mixture immediately; instead, I focus on preparing my other components. I concentrate on the crust. It will sit and thicken, becoming even more delicious.
Creating the Perfect Crust
- Before anything else, ensure your oven is on! Adjust it to 350 degrees Fahrenheit.
- Pull out the food processor (or a homemade one, a rolling pin and your muscles if you do not have a processor).
- Crumble the graham crackers and turn them into a very fine powder. This might be the best part of the recipe.
- Lastly, put in the sugar and a pinch of salt. Give it a quick mix.
- Spoon in the melted butter—It helps the batter stick together to produce the crust.
- Process the mixture until it resembles wet sand. It should form a compact lump that can be easily shaped with the palms of your hands.
Shaping and Baking the Crust
1. Take a 9-inch pie dish. I have a metal one in my kitchen, and it works really well. If you don’t have a metal pan, it’s okay.
2. press the crust into the dish with hands.
- Cover the bottom evenly
- Press the crumbs up the dish’s sides.
3. Place the crust in the oven for 10 to 12 mins.
- Look for a light golden color.
- It should smell amazing and toasty!
Putting It All Together
- Remove the crust from the oven then let it stand for some time before serving.
- Whisk your lime filling one more time.
- Reduce the heat to 325 degrees F.
- Once the crust has cooled a little, spoon the filling into it.
- Bake for 15-17 minutes.
The pie should be solid, but when gently shaken in the middle, it should move a bit.
Wait For Optimal Results
- At room temperature, let the pie cool until it is completely cold.
- Then place it in the refrigerator.
- If possible, wait for at least 3 hours (or overnight if you are able!).
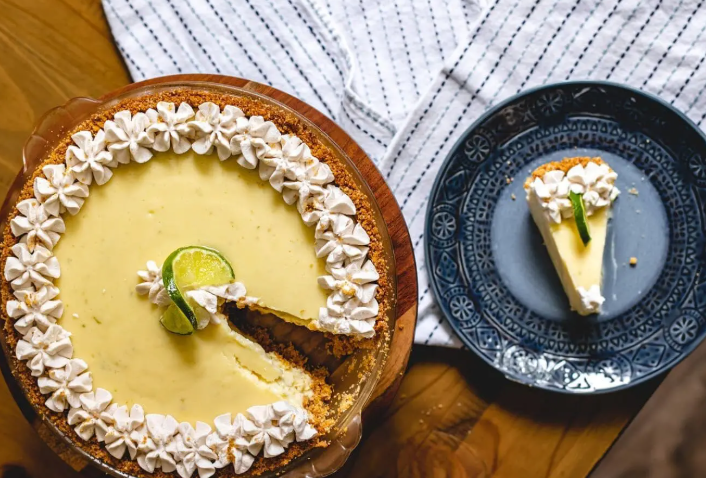
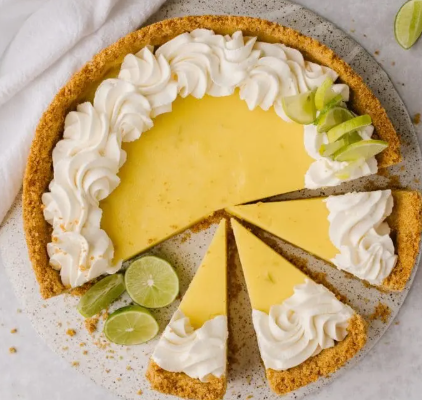
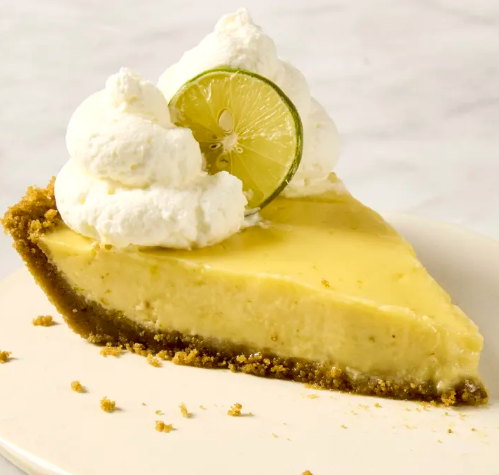
The Grand Finale: Whipped Cream Topping
- Get a hold of your heavy cream right before you are ready to serve.
- Beat it until it gets smooth and it forms soft peaks.
- When the pie is done, cover it with chilled whipped cream.
Pro Tips for Young Bakers
- You can ask your adults for help when using sharp tools or setting the oven timer.
- Yes, it’s super important to wash your hands. I have a habit of washing my hands every little while when I’m making a recipe.
- Dealing with zesting limes can be a bit tricky, so always be patient.
- When making a recipe, you should enjoy the process; it is not necessary for the recipe to be perfect on the first attempt.
Some Serving Suggestions
Always cut it with a sharp knife. And after it’s cooled, cut it.
Key Lime Pie Quick Fixes for Common Issues
1. Pie Too Runny?
If your key lime pie has turned into a pudding, then chilling is your solution to help firm it up. The filling needs time to set properly, which means:
- Let it chill for about 4-6 hours or, even better, freeze overnight.
- Check that your refrigerator is cool (around 40°F).
- Place the pie loosely with a clear plastic sheet.
- Avoid slicing off a piece of the pie too soon.
- The eggs and the condensed milk take time to set properly.
2. Crust Too Crumbly?
A weak, cracking crust can turn your lovely pie into a luscious pudding. The secret is all about butter:
- Cover your crumbled graham crackers with a little more melted butter.
- Sand that is wet enough to form a clump when pressed is the ideal consistency.
- Make sure the crust is tightly packed into the pie dish.
- Just scoop a measuring cup full of mixture on the baking tray and spread it evenly and compactly.
- I do advise chilling the crust before baking, which helps it to firm up.
3. Filling Too Tart?
Sometimes those limes can be really tart; I have quick solutions for this too.
- Pouring more condensed milk can solve the problem.
- As you think of the next one, try a little of the filling.
- Always make it possible to use fresh limes to get better control over the level of acidity.
- Since the recipe tends to be a little tangy, it is advised to use a small amount of vanilla extract.
- Remember that different types of limes may have varying levels of vitamin C and be more or less acidic.
What Makes This Pie So Great?
Taking some inspiration from it, and by employing an organized mindset and simple strategy, I have succeeded in balancing my daily schedule for the last few years – I literally cannot remember the last one that I blew.
Thanks to lime juice and zest, the dessert becomes a bit more refreshing and zesty. I usually get a craving for this type of flavors during summer and it is so nice that I can use the zest I have frozen from winter limes for these treats in summer.
The condensed sweetened milk never provides too much of the ingredients’ sweet and creamy, creating the perfect blend.
Tips to Make It Even Better
- Switch Up the Citrus: Want to mix it up? Try using some lemon or orange juice along with lime for a fun twist.
- Dress It Up: Garnish your pie with lime slices, grated zest, or even edible flowers to make it extra fancy.
- Go Mini: Make personal-sized pies in tart pans or ramekins. They’re great for parties or when you want to treat yourself.
A Little Key Lime Pie History
This pie’s got a story to tell. It’s believed to have been created in Florida in the late 1800s, back when people didn’t bake it—they let the lime juice and condensed milk do all the work by thickening the filling on their own. Nowadays, the majority of recipes call for baking to ensure that the pie has the ideal texture and is safe to Most recipes today call for baking to achieve the perfect texture and ensure safety. This dessert combines tradition with modern techniques, which is why it remains timeless.
Great food brings people together, and Key Lime Pie is one (no doubt). After they taste your masterpiece, you can see how happy your friends, family, or coworkers are.